DIY Make your own Egg Tumbler (and save lives!!)
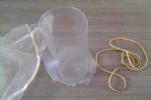
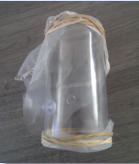
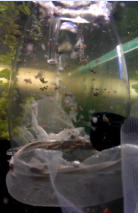
Here is a small explanation and some information on how to make and use an egg tumbler. As the word says it is an egg tumbler. It will keep the eggs moving/bouncing around so the eggs get better air/water flow all around and do not start to rot as they would just laying around somewhere in your tank. These tumblers are used by hobbyist for hatching shrimp fry , usually brine shrimp, to feed to their fishes. I found they are also VERY helpfull when having one of your egg carrying shrimp die for some reason. Loosing one of your precious shrimp is always a sad thing but to see one carrying eggs it counts for even more losses. Now there is an up and a downside to this. The down side is you will have to “operate” on your egg carrying shrimp. But since it is dead it will not feel this and you should see it as saving lives! Things needed: Plastic tube/bottle part. fine mesh netting / like fishnet. air pump & hose. suction cup (optional) Take a plastic tube or bottle and cut a part of about 3-4 inches. make a small hole near the bottom of this plastic part to insert the airhose into and attach the pump to other end. Make a hole for the suction cup(optional) You can also hang it in your tank somehow. now attach the netting to one side of the tube/bottle with a rubber band for example. Put the tumbler into the tank about 3/4. Put the eggs into the tumbler and close of the other end of the tube with some more netting. Now turn on the airpump and watch the eggs bounce around in the tumbler on the lower netting. Hopefully if all goes well you will see VERY VERY tiny shrimp fry at some point in this tumbler. If eggs turn wgite this means they are rotting and will probably not survive the ordeal. Hope this will help save some lives out there!! The Operation: I had to do this on my LAST ROYAL BLUE TIGER SHRIMP. Due to wrong water parameters they nearly all died except for this last one. Put it into an other tank where it did a little better and got pregnant. Unfortunatly it died a little while after this and i felt like i had to try and save them. And i DID!! 5 survived the ordeal so i think it was a success. i do not have pictures from this but i will explain what i did.ALso later on a crystal SS grade. Take the carrying shrimp and take some CLEAN and SHARP scissors. It is important they are very clean and sharp!! .It is an operation! Take a small glass or plastic container and fill this with a little of the aquarium water. This will be our “wet operating room” Now cut the head of the shrimp off just behind the head and close to the eggs. Try not to cut into the eggs but you might loose some in the process. Now cut of the tail at a slight angle from the body so you also cut open the back/spine. Once this is done you are left with a small piece containing the legs with body part that has the eggs in it. Now take two tweezers and grab the legs that are still attached and pull it apart bit by bit. You will see every part will have one or few eggs attached to it or maybe even separate the egg completely from the mother. Don’t try to grab the eggs with the tweezers of course as you will kill the fry. Instead only try to grab the “mothers body parts” to tear it apart. Once you have them somewhat separated put them into the egg tumbler and watch them bounce around inside it.